Overview
In this lesson, students will change paper by using just their hands as tools.
Materials and Tools
- Colored construction paper (three sheets of the same color)
Objectives
Students will understand how to:
- The properties of paper: how paper looks, feels, sounds, and smells.
- Paper can be transformed from something that is two-dimensional (2D), into something that is three-dimensional (3D).
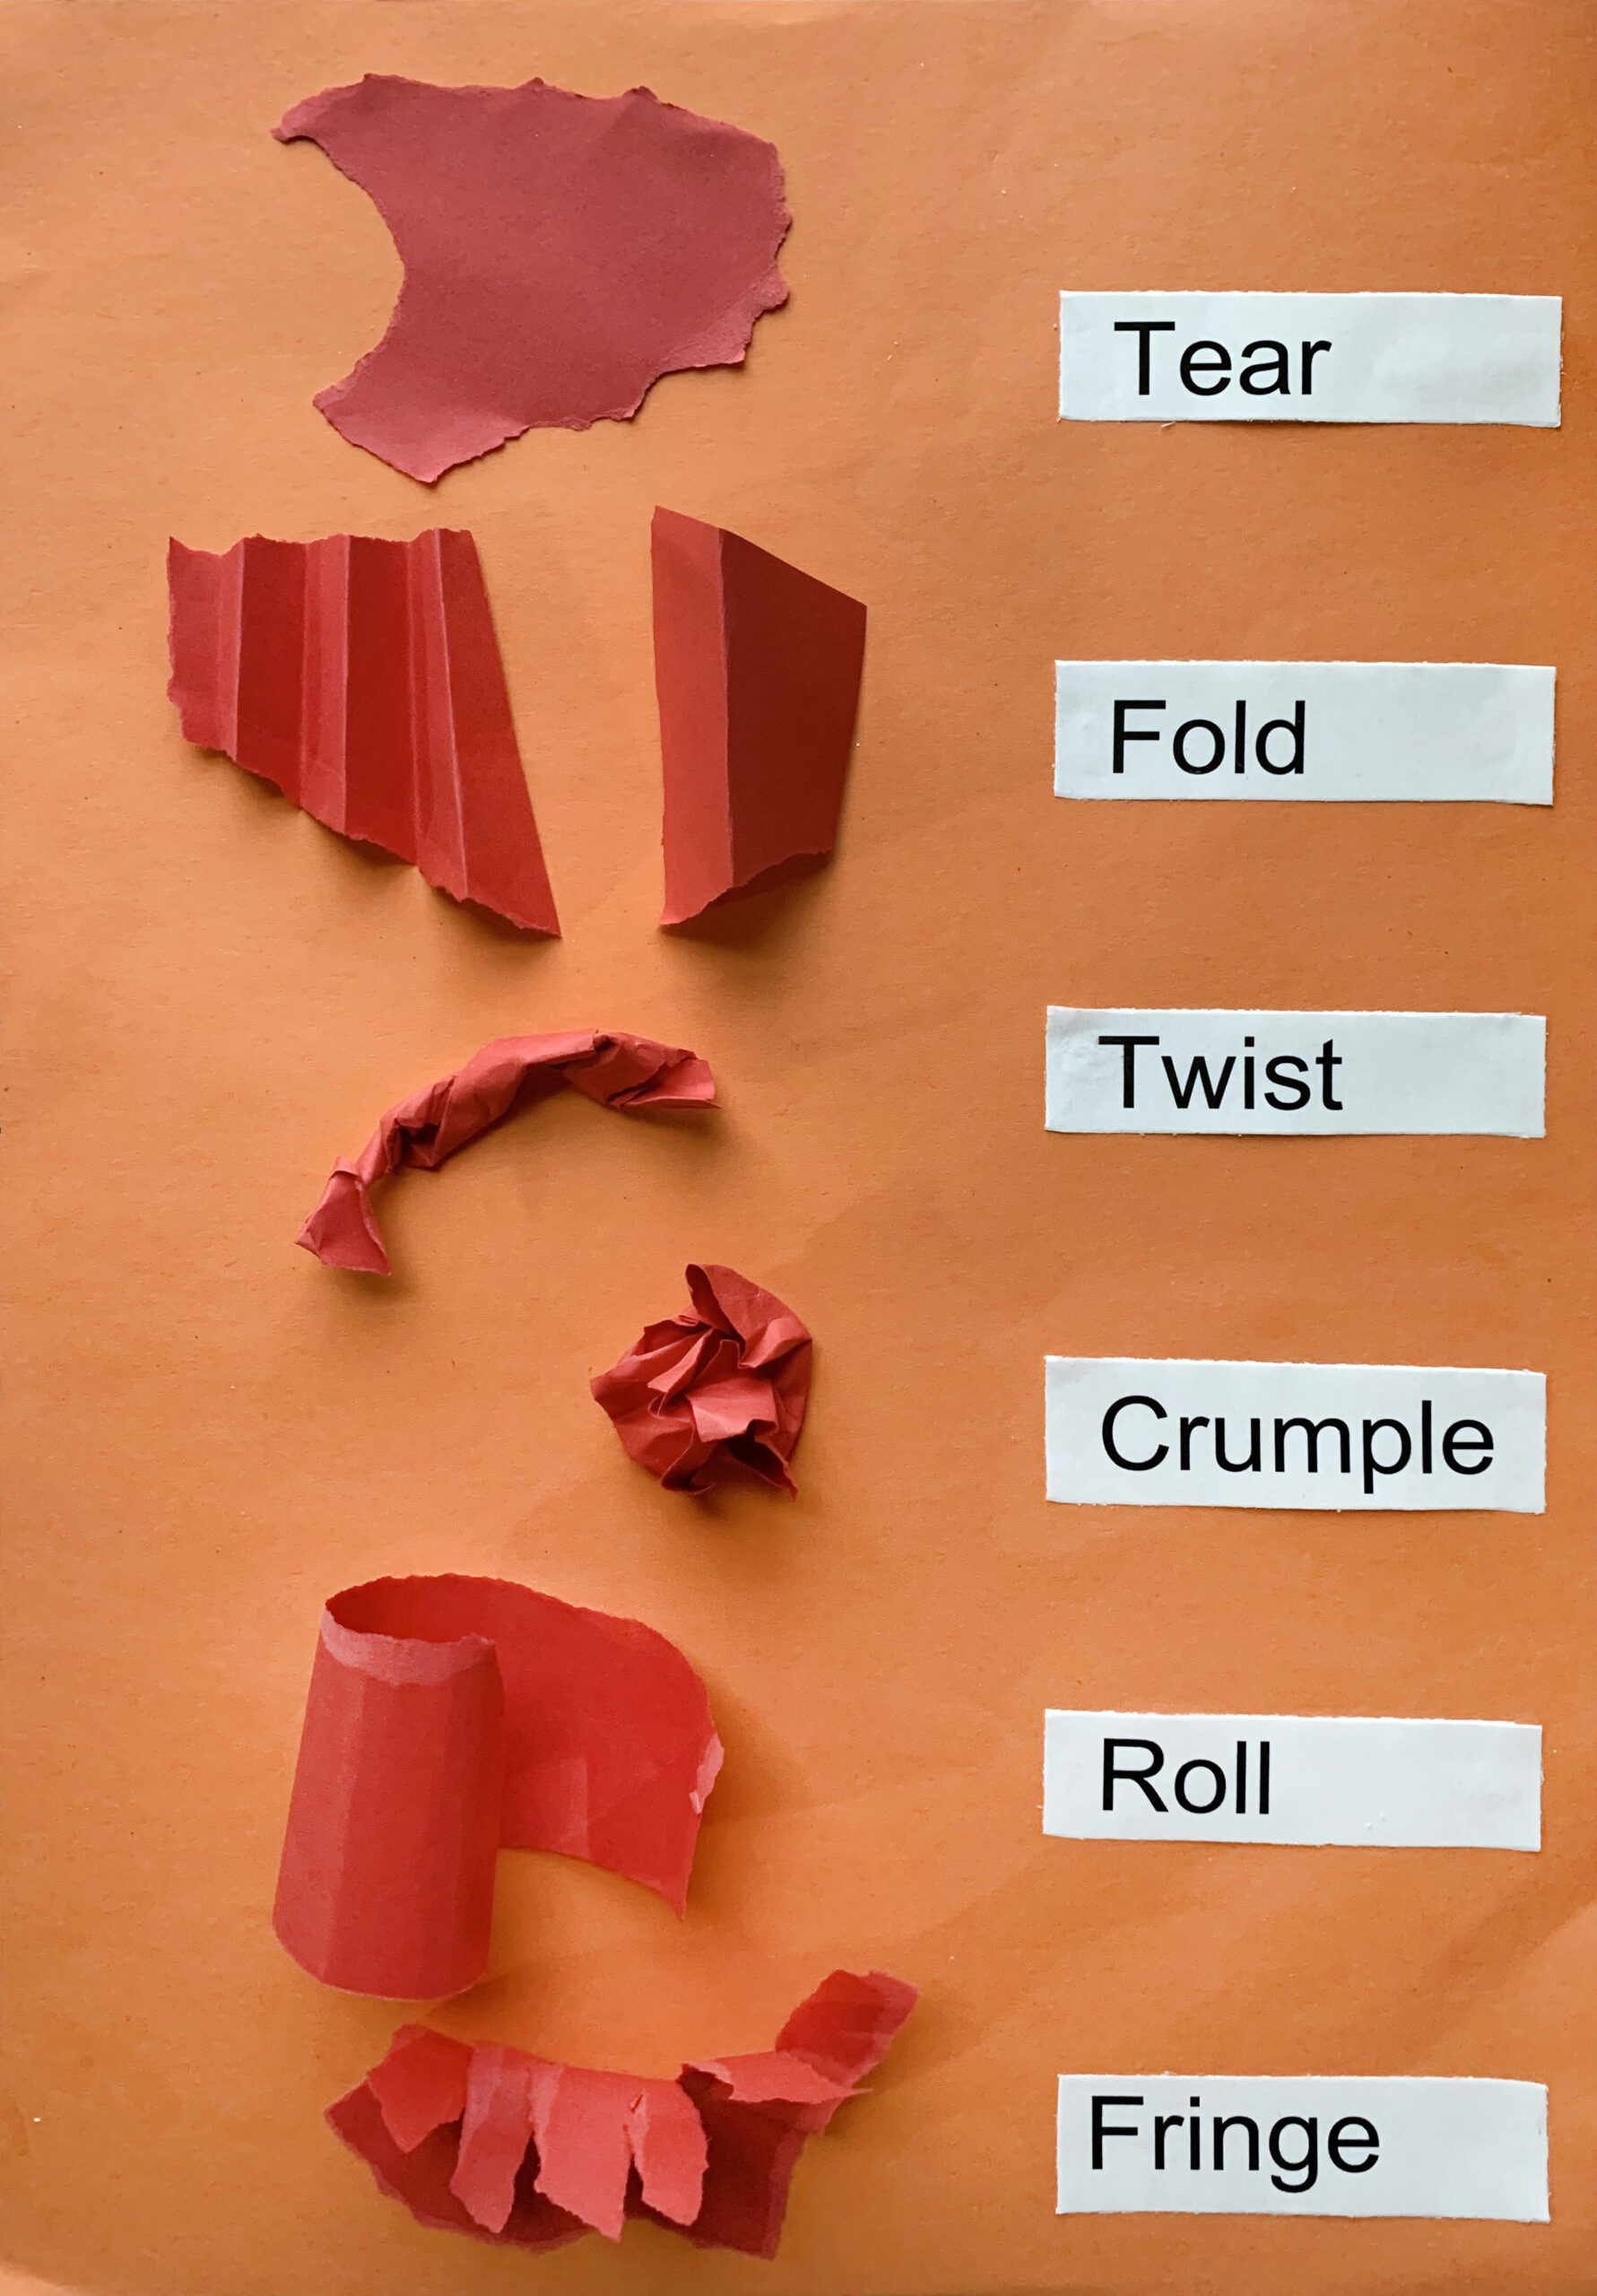
- Paper can be changed in different ways, such as using hands to tear, fold, twist, crumple, roll, and fringe.
Students will be able to:
- Brainstorm words to describe paper by using a multi-modality approach.
- Demonstrate how to use their hands as tools to change paper by tearing.
- Identify how to transform paper from 2D to 3D by folding, twisting, crumpling, rolling, and fringing.
Activities
Engagement
Show:
Use your senses to explore the properties of paper alongside students. How does it look, feel, sound, and smell? Remind students that there are no right or wrong answers.
Examples of words to describe paper:
- Flat
- Straight
- Bumpy
- Stiff
- Flexible
- Smooth
- Rough
- Thin
- Lightweight
- Stiff
- Rustling
- Loud
- Quiet
Demonstrate:
Use your hands as tools to tear one sheet of paper into three medium or large shapes. Tear the other two pieces of paper in half, one horizontally and one vertically.
Ask students what they notice about the edges of the torn paper.
Try different ways to transform the paper from 2D to 3D by folding, twisting, crumpling, fringing, and rolling. Ask students for their ideas.
Work Time
Have students tear their paper into shapes and explore transforming them from 2D to 3D:
Motivation Questions:
- What are the properties of paper? Use your senses to describe how it looks, feels, sounds, and smells.
- How can you change paper using just your hands as tools? What if you use just your fingertips? Or your fingertips and your wrist? Or your whole hand?
- How can you change the paper from something that is flat, or 2D, into something that stands up, or is 3D? What other materials can you tear, roll, fold, twist, crumple, or fringe?
- Try turning your pieces of paper in different directions. How many ways can you make your pieces stand-up? What do the pieces remind you of? What do you see that makes you say that?
Reflection
Prompts for Discussion
- What is something new you discovered by working with paper today?
- Choose one shape that you made. How does it look, feel, and sound?
- What does that shape remind you of? What do you see that makes you say that?
- Choose two shapes that you made and look at them closely. Try closing your eyes and feeling your shapes. Do you notice anything different about them? Open your eyes and compare and contrast your shapes:
- What are three things that are the same about your shapes?
- What are three things that are different about your shapes?
- Using the “Think, Pair, Share” strategy, talk to a partner about what you noticed.
Close-Looking Activity
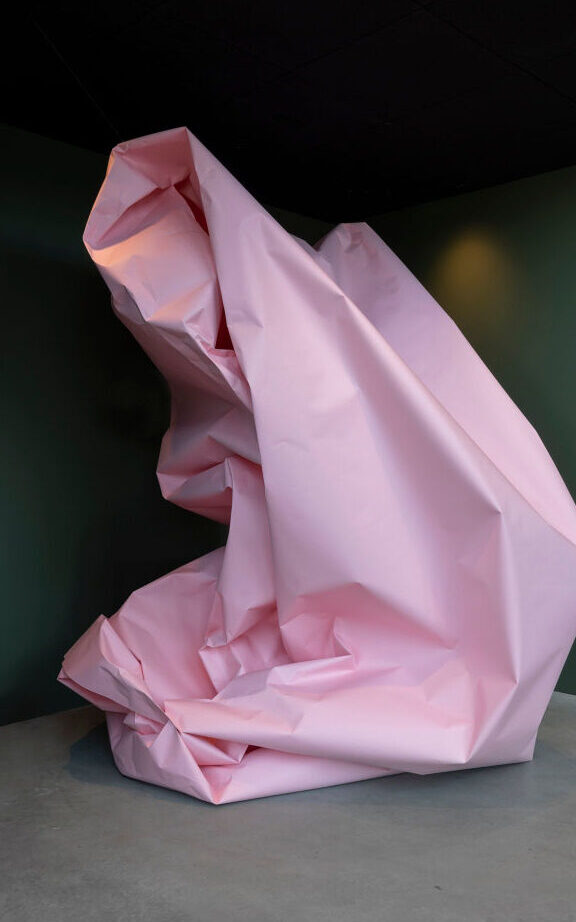
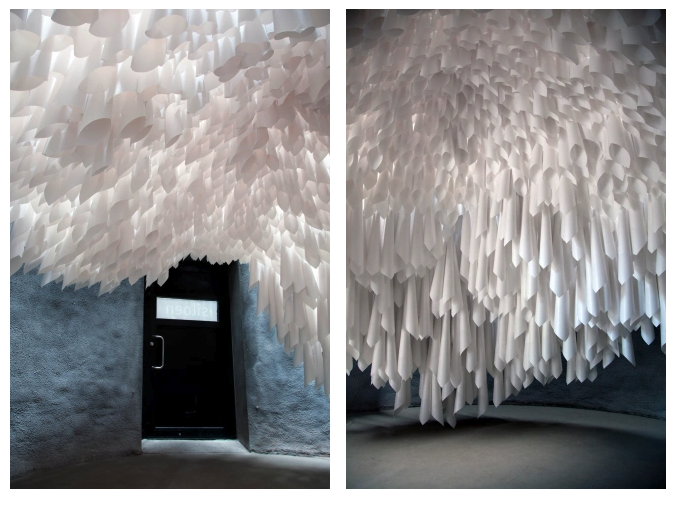
One of these sculptures is a relief. It has parts that stand up, but it is attached to the wall and the floor. The other sculpture is free standing. You can walk around it and see it from all sides.
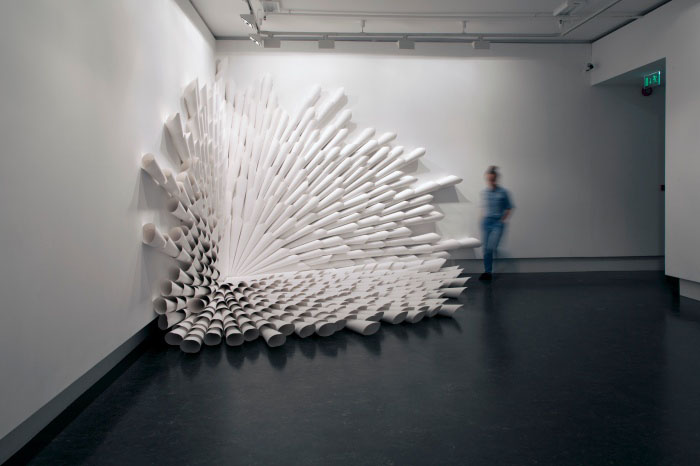
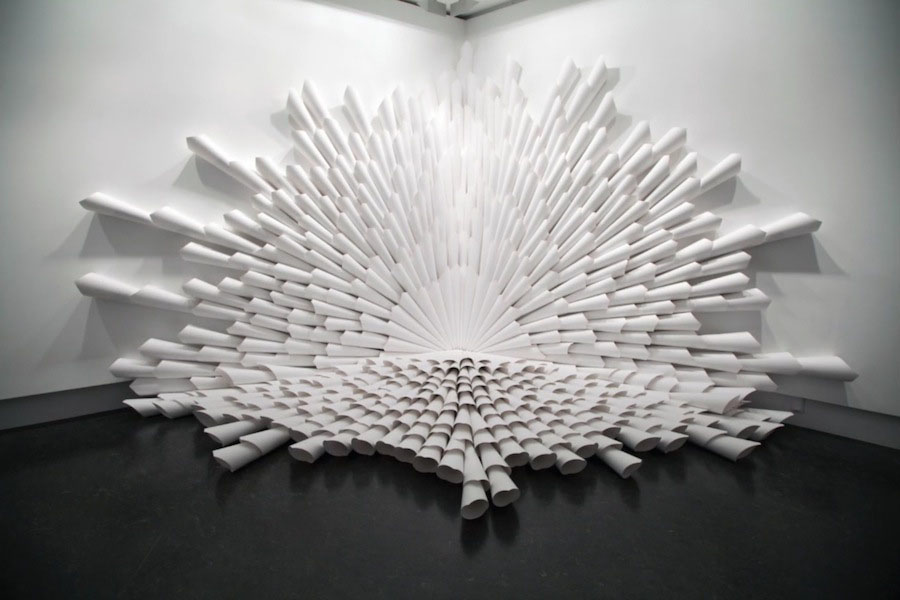
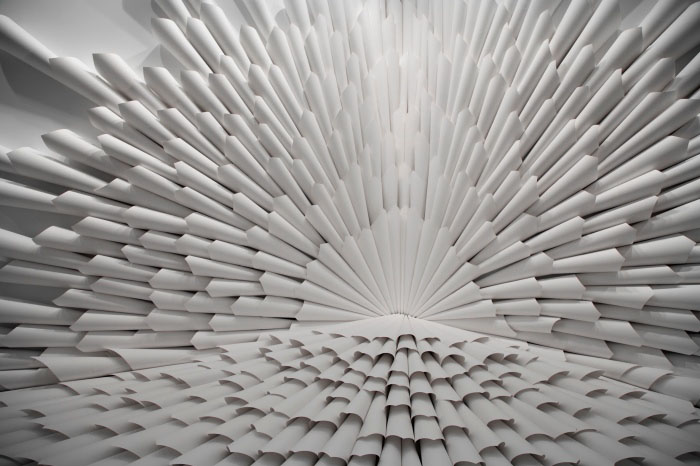
Marit Roland, Paper Drawing #14, 2015, SKMU Sørlandets Kunstmuseum, Kristiansand

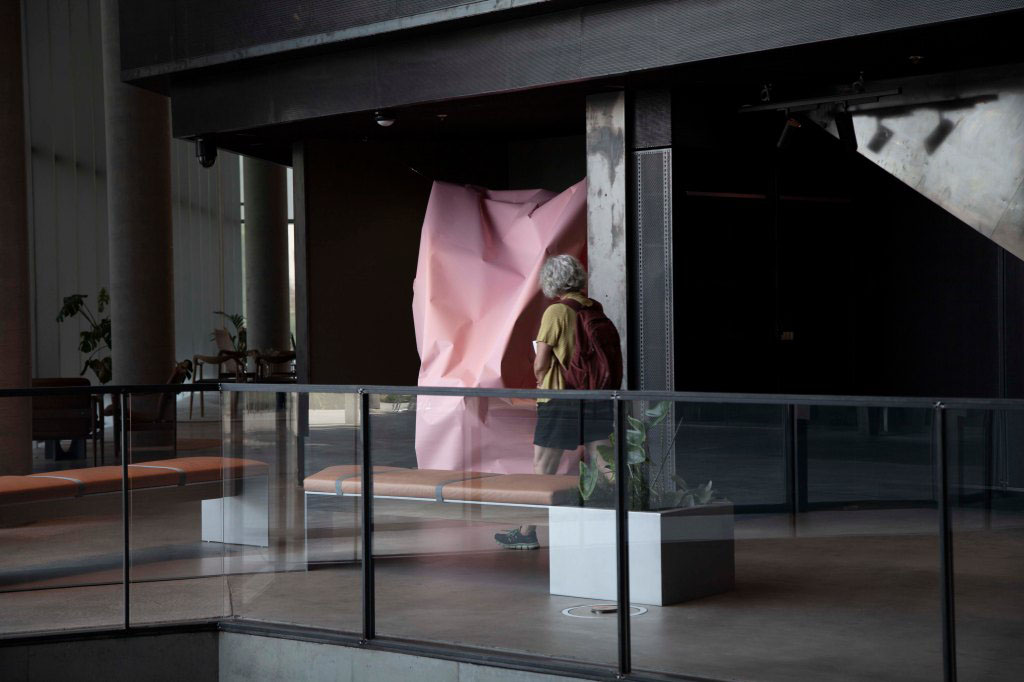
Marit Roland, Paper Drawing #31, 2020, Deichman Bjørvika, Oslo. Photo by: Marit Roland/Øystein Thorvaldsen
- What words would you use to describe each artwork?
- How are the pieces the same? How are they different?
- How do you think the artist changed the paper?
- What do you notice about how these artworks are arranged in the spaces they are in?
Writing Activity
Reflect on the process of exploring ways to change paper.
Ways to change paper:
- Tear
- Fold
- Twist
- Crumple
- Roll
- Fringe
Write about your discoveries.
- Something new I discovered about paper is _____________.
- My favorite way to change the paper is by _________ because __________.
- The most challenging part of changing the paper was ____________.
- I solved the challenge by _____________.
Connect to a personal experience: Write about a time when you used your hands to tear, roll, fold, twist, crumple, or fringe something.
For example:
Last weekend I baked some cookies. We used an old family recipe to make almond cookies. They are my favorite. The best part is when the cookies come out of the oven because I get to help roll them in powdered sugar. I use my hands to roll the cookies while they are still warm. They taste so delicious!
Sketchbook Activity
Pick one shape that you made and turn it around in different directions. Draw it from three different viewpoints (top, side, standing up). Include light and shadow.

How would you describe your shape?
Use labels in your sketchbook. Examples:
- Ridged
- Rough
- Smooth
- Patterned
- Bumpy
- Spiked
- Curved
- Straight
- 2D or 3D
- Zigzagged
- Striped
Or
Choose one of your shapes to use in a drawing. Look closely at your shape and turn it in different directions (top, side, standing up). What does it remind you of? Draw it in your sketchbook. Now add on to your drawing including more shapes to create something new.
For example:
If your folded shape reminds you of stairs, draw what is around the stairs. What do the stairs connect to? Are you inside a building or outside?
Vocabulary
Emotion
Mood
Composition
Exaggeration
Resources
Making Paper Three-Dimensional
Martin Roland paper sculptures and installations
https://maritroland.wordpress.com/
Mexican Folk Art: paper mache alebrijes
https://www.youtube.com/watch?v=dmTSY-VozkA
Adaptations
ADAPTATIONS FOR STUDENTS WITH DISABILITIES
- Think about the sounds paper shapes might make.
- Use hand and body movements to make lines seen in new paper shapes.
- Use sounds to describe paper shapes.
- Use an iPad or Google Classroom to draw lines and shapes.
- Use the “Think, Pair, Share” strategy to partner students to help with understanding, verbalize ideas, and share their process.
ADAPTATIONS FOR MULTILINGUAL LEARNERS
- Multi-modality learning
- Total Physical Response (TPR)
- Provide visual examples to support words and concepts
- Demonstrate
- Use repetition
- Paraphrase
- Chunk information
- Use equity sticks when calling on students
Extensions
- Keeping a writing and drawing journal of paper discoveries
- Exploring paper relief by arranging shapes into different abstract compositions
- Creating a paper relief self-portrait or portrait of an imaginary person by arranging the shapes in different ways to express different facial expressions and emotions
- Using paper relief to create imaginary creature puppets, looking at alebrijes from Mexico for inspiration
- Exploring ways to change cardboard and brainstorm similarities and differences between cardboard and paper
- Using manipulatives or found objects and arranging them into sculptures
Credits
Written By:
Traci Talasco, Artist Instructor
Lesson Development:
Julie Applebaum, Senior Director
Copyright © 2023 Studio in a School NYC LLC