Overview
Students will look for found objects in the home to be used in their sculptures.
Students will sort and organize these materials in different ways.
Grade Level
6-8
Media
Sculpture
Theme/ Big Idea
Artists can express ideas by using different materials to make lines, shapes, and forms.
Essential Question
How can we use everyday materials to make expressive face assemblages?
Materials and Tools
- Found household objects
- Assemblage Sculpture video
- Assemblage Sculpture student slides
Objectives
Students will understand that:
- Selection is a powerful tool of expression that demonstrates preferences and identities
Students will be able to:
- Gain sensitivity to materials beyond their original functions
- Understand that the meaning of an object will change according to the context
- Develop an informed, critical eye to their surroundings
Activities
Note: The following steps are written with sample language you may use with your students as you go through the lesson. Explain to students that the slides and the video they see during the lesson will be shared with them so they can review the lesson on their own and continue to make more art.
Step 1: Introduction, Found Object Collection, with Student Slide #2 (13 minutes), Watch Assemblage Sculpture Video (9 minutes)
Today we will begin thinking about how everyday materials can be used to create an assemblage. Observe Lisa Rupp’s assemblage Junkyard Dogs in Student Slide #2. What do you notice about the materials the artist uses to create the dogs? The artwork is titled Junkyard Dogs.
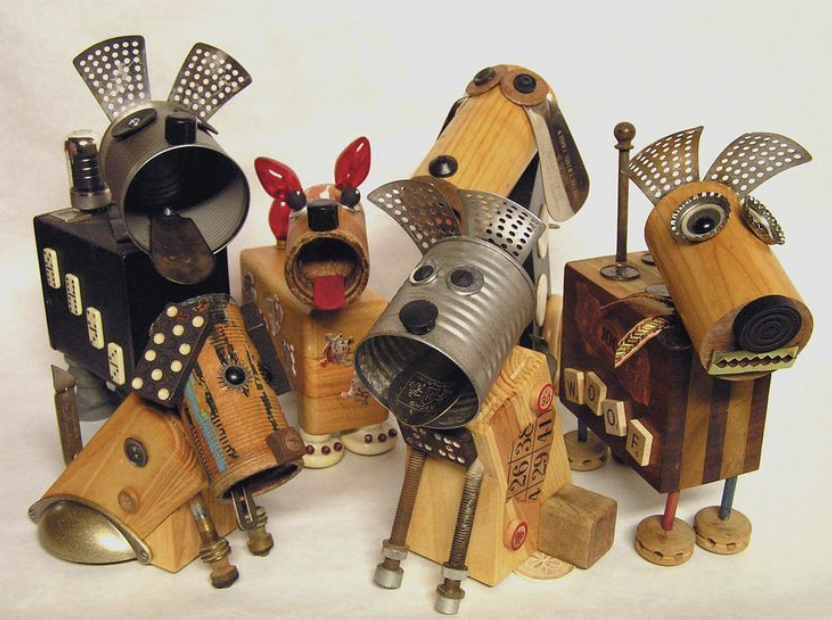
- What connections can we make between the sculptures and the title based on your previous observations?
- How does this work help you think about sculpture in a new way?
Step 2: Found Object Scavenger Hunt, with Student Slides #3-4 (15 minutes)
Like Lisa Rupp, you will be assembling found objects to create a sculpture. Today we will focus on collecting our objects. Look at Student Slide #3 and #4.
- What kind of objects and materials did the artist collect?
- How are the objects similar and different?
- Why do you think collecting objects of varying materials, sizes, textures, and colors will be useful when you begin creating your final piece?
Find a box or large bag that you can use to store your objects and materials before you begin your scavenger hunt. A great place to begin looking for found materials is your recycling bin. Review Slide #4 to for more inspiration.
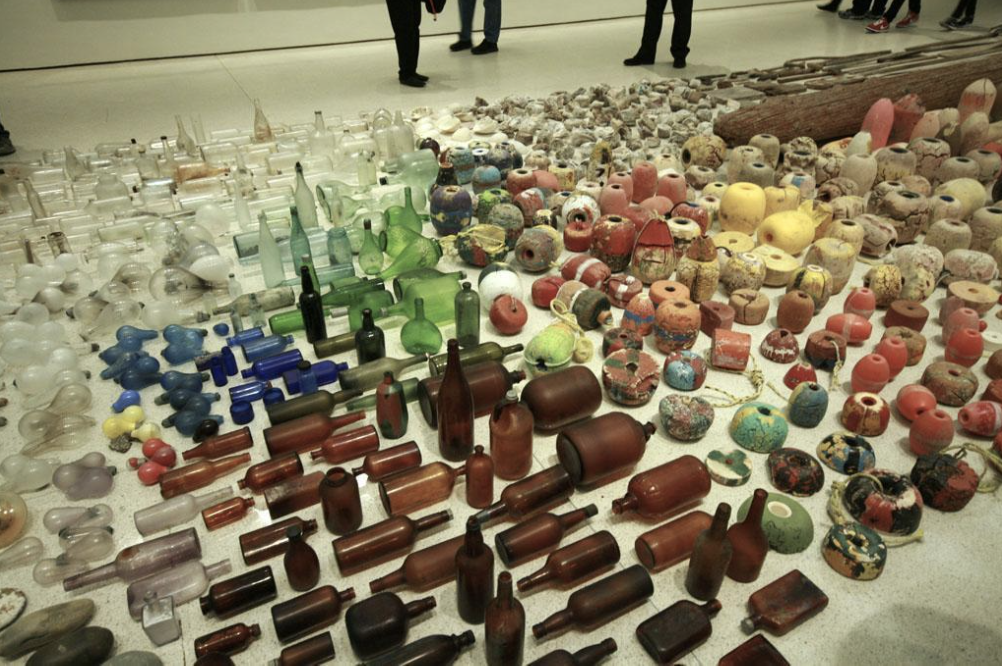
Step 3: Sorting, Organizing, and Documenting Materials, with Student Slides #5-7 (15 minutes)
Now that we have collected our objects, let’s take a close look at what we have. Observe Student Slide #5.
- What do you notice about the way the materials are organized?
- Why do you think sorting and organizing our objects is an important part of the process of getting ready to make an assemblage?
Using the list on Slide #5, begin sorting your objects. Explore three or four ways of sorting and organizing your materials.
As you work, be sure to document the different ways you organize your materials by photographing them. Next time you will review your photographs to help you make choices as you create your assemblage. Be sure to review Student Slide #6 for some useful tips on how to photograph your collections.
Step 4: Reflection Questions for Discussion (10 minutes)
Look at the objects you have collected.
- Why did you choose these objects?
- How are the objects similar to each other? How are they different?
- What was your favorite way to organize your materials? Why?
Vocabulary
Collect
Sculpture
Assemblage
Mixed media
Found objects
Sort
Resources
- Lisa Rupp, Junkyard Dogs, mixed-media assemblage: http://www.mixedmediamax.com/cats-and-dogs.html
- Tony Cragg, Yellow Axe, 1981. Installation comprised of 63 found yellow plastic objects
- Arman, Car Accumulation (Matchbox Cars), 1985. Matchbox cars in epoxy resin, 12 × 9 × 3”
- Gabriel Orozco, Sandstars. 2012, Installation, Solomon R. Guggenheim Museum: https://www.guggenheim.org/artwork/30591